Deploying a Docker Container to AWS with Elastic Beanstalk

Overview:
Elastic Beanstalk is an AWS service that leverages Amazon EC2 and S3 and deploys, manages and scales your web applications for you. It uses managed containers that support Node.js, Java, Ruby, Docker and more. There are multiple ways to deploy applications using Elastic Beanstalk. You can deploy using the management console, the CLI, or the API. The amazing thing about Elastic Beanstalk is that once you upload your application, it takes care of things like load balancing, health monitoring, scaling, and more. Check out more information on Elastic Beanstalk! Overall, Elastic Beanstalk builds your docker image using your uploaded source code, and then it is deployed to EC2 instances running in an Elastic Beanstalk environment.
In this tutorial we will:
- Deploy our Docker container with Elastic Beanstalk using a single container configuration (run 1 container per EC2 instance), using the Elastic Beanstalk CLI. (Stay tuned for more tutorials on how to deploy using other methods)
- Use a Dockerfile for our configuration for simplicity, instead of a Dockerrun.aws.json definition file that is a second config option with Elastic Beanstalk.
There are 3 parts to this tutorial: creating the app, dockerizing the app, and deploying the app with Elastic Beanstalk. You are not limited to use the Node.js app that I create in this tutorial, feel free to skip parts 1 and 2 if you either have a dockerized app already, or if you download and set up the Node.js app that I have provided on github. The app that I create below is the same app that I provide on github, but with some additional Travis CI configurations.
Prerequisites:
- Create an AWS account. AWS offers a free tier with access to a lot of cool services such as Amazon EC2 and S3.
- Download the Elastic Beanstalk (EB) command line tool which we will use in this tutorial to deploy our docker container manually from our machine. Follow these instructions on how to set up the EB CLI.
- Download the latest version of Node.js (if you follow part 1)
- Download Docker.
- Download and install Git. Git is used by EB CLI to deploy your last committed code.
- Set up your favorite text editor. I like to use Visual Studio Code
Part 1: Creating our application
I will first be creating a very simple Node.js application which I will dockerize in part 2 of the tutorial.
- Create a directory that will hold your application, I called mine “elastic-beanstalk-tutorial”.
- Open a command prompt and change into your project’s root directory. Initialize your project by running
npm init -f.. After running the initialize function, npm will create a package.json for you. - Create a new file in your project’s root directory called app.js. In app.js add the contents below:
App.js contains code that runs a very simple web server using express, and logs requests using morgan.
- Now we need to install our dependencies using
npm install --save express morgan, which will install and add our dependencies to the package.json. - Add a start script to the scripts section of the package.json which we will need to use in the dockerization step:
"start": "node app.js" - Now to make sure everything is running fine, run
npm startand you should see the console printApp running at http://localhost:8080. Open a web browser and you should see the texthello world!!displayed on the screen.
Part 2: Dockerizing our application
Now that we have a very simple Node.js web server running, we can start dockerizing the application in preparation for deployment to AWS.
- Add a new file to your project’s root directory called “Dockerfile”. The Dockerfile will contain instructions to assemble your application into a Docker image. Below are the contents of the Dockerfile for this application:
The first line is specifying to use the node alpine base image. The alpine image is great if you need to create as small of an image as possible, since it is only about 5MB, but feel free to use any image you desire. The rest of the file contains standard Docker commands with instructions on which files get copied over and how to start the web server etc..
- Now add a new file called .dockerignore to your project’s root directory. The .dockerignore specifies which files and folders to ignore in the COPY step. In the .dockerignore, add the 2 lines below to ignore node modules and the npm debug log.
- Now that our Docker configurations are set up, we can build and run our image for testing before we deploy with Elastic Beanstalk. Open a command prompt in your application’s root directory. Note: on Windows platforms, you might need to use the Docker Quickstart Terminal to run Docker commands, which comes packaged with Docker downloads on Windows.
- In your terminal run the command
docker build -t eb-tutorial .. This command will build your image and tag it with the name “eb-tutorial”. You can tag it with whichever name you would like. If there were no errors building the image, you can rundocker imagesand your image should be in the list. - To run a container out of your newly created Docker image, use the command
docker run -d -p 8080:8080 --name eb-tutorial eb-tutorial. The -d flag runs the container in detached mode, -p specifies the port configuration, and the name flag specifies the container name. Now runningdocker psin the command prompt should show your running container. Navigate to http://localhost:8080 and you should see the “hello world!!” message once again. Note: if you are running on Windows, localhost will not work, you will need to navigate to http://<ip docker runs on>:8080/. The ip is usually displayed when Docker Quickstart Terminal first starts up.
Part 3: Deploying our application with Elastic Beanstalk CLI
Woohoo! Now that we set up our Node.js app and Docker, we can finally deploy to AWS with Elastic Beanstalk!
- Open a terminal in your app’s root directory. The first command we will run (assuming you set up eb cli) is
eb init. The init command configures Elastic Beanstalk for your project. - If it is your first time using eb cli, the first thing it will ask is for your user credentials, so paste in your access keys. If you do not have access keys, you will need to go to the IAM/Users dashboard and create a new user with full access, or whichever access roles you would like provide that user. Then make sure to download the keys when it prompts you to and save them in a safe spot, since you will only have 1 chance to download them. Paste these keys into the command prompt.
- The init command will then ask for other info like the region, name of the app etc.., just follow the prompts and enter the correct information. Note: the cli will detect you are using Docker since you have Docker configurations in your application. Also, I usually say no to setting up “code commit” and “ssh”.
- Once the init command successfully finishes, notice there is a new directory in your project called .elasticbeanstalk which contains the generated configurations. Now we can create our new environment to deploy to by running
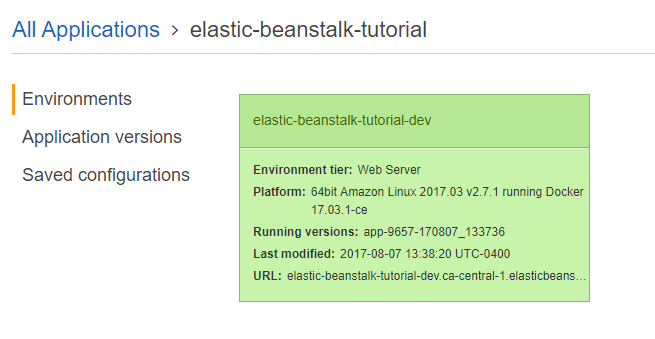
eb create. Follow the prompts for this command as well. If you navigate to the Elastic Beanstalk service in the AWS management console, you will see that your new application is being created like below. It should take a few minutes for your application to be created.

- Once your application has successfully been created and deployed, it should look something like below:
- Important Note: I am using git with this tutorial, and if git is installed, EB CLI will only deploy the most recently committed code. Sometimes if you deploy and forget to commit your code, your application deployment could fail, or your app could behave unexpectedly. EB CLI will usually warn you in the command line if you deploy with uncommitted changes. More info on eb debploy here.
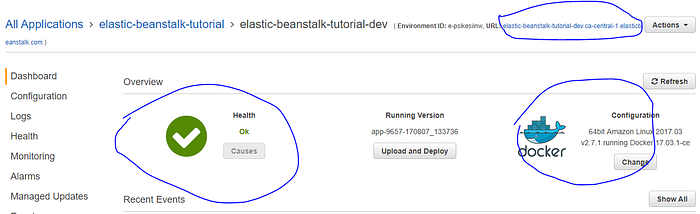
- Click into your application and you should see a page like below. The health should be green, it should be running a Docker configuration. If you click the url that your app is running on, it will take you to your app, and you should see the same “hello world!!” message in the browser that you saw when you ran your app locally.
Yay! we have successfully deployed our application with Elastic Beanstalk!!
As I mentioned in the overview section of this tutorial, your Docker container runs on an EC2 instance. If you would like to see your running EC2 instance, you can navigate to the EC2 dashboard in your management console and view it there, where you can gather information on the instance such as the type, state, and other information of your instance.

Closing Notes:
And just like that, we’ve deployed our application to AWS using a few simple CLI commands! You don’t need to worry about manually setting up EC2 instances, provisioning, or scaling, it’s all done for you using Elastic Beanstalk!
Remember, with Elastic Beanstalk, you are not limited to using Docker or the CLI! Elastic Beanstalk gives you the option of using several languages and platforms as well as different ways of deploying your app that suit your needs.
Feel free to give me suggestions on other Elastic Beanstalk tutorials that you would like to see!
Happy Coding!! 😄
Disclaimer
I’m an employee of IBM. The views expressed in this blog are mine and don’t necessarily reflect the positions, strategies, or opinions of the company.